They say Auguste Escoffier created this dish in honor of the opera, La Belle Helen, but we chefs know the real reason. How else are you going to use up bruised pears in such a delicious and beautiful way? Okay, so maybe that wasn’t his motivation, but as you’ll see in the video, it sure does work great.
The recipe is very straightforward, so instead we’ll go into your options for the chocolate sauce, as well as what to do with all that extra simple syrup. We have two chocolate preparations that will work for this (and have been linked). The first would be our easy hot fudge recipe; and the second, and more traditional choice, would be the classic chocolate ganache.
If you follow the link to the later, you’ll be taken to our Boston Cream Pie video, where you’ll see the technique for creating a classic ganache, but you’ll probably need to adjust the ratio of cream to chocolate. Generally it’s equal parts chocolate and cream, but if you want something more pourable, then 2 parts cream to 1 part chocolate (by weight) would work better.
As far as the extra vanilla poaching liquid goes; you’ll want to strain it, pour it into some cool looking bottles, and give it away as edible gifts. The taste is incredible. Better than the pears, if we’re being honest, and would make a fantastic holiday treat for the wannabe mixologists in your life. I really hope you give this a try soon. Enjoy!
Ingredients for 4 poached pears:
6 cups water
zest and juice of one lemon
4 bosc pears, cored and peeled (you can also use Anjou or Bartlett)
1 split vanilla bean, or a few teaspoons of vanilla extract
3 cups sugar
Simmer for about 20-25 minutes, depending on size and firmness
There are many different techniques used for making financiers, but as usual, I’ve chosen the easiest one. I would have been happy to try those other more complicated versions, but fortunately, I enjoyed this one so much, there’s no need.
I mention in the video that these are called “financiers” because they’re rich, and look like gold bars (if you use the traditional rectangular molds). Well, apparently that’s not quite right.
Word on the “rue” is that there was a bakery next to the Paris stock exchange that made these small almond cakes so bankers could enjoy them on the way to work, without getting their fingers dirty. I assume this is accurate, since I read it in the YouTube comments.
Anyway, not only is this an easy recipe, but it works beautifully with pretty much any summer fruit. Berries are popular, as are other stone fruits. Just don’t use too much. It’s merely a garnish, and adding too much could effect the texture and cooking time. I hope you give these delicious peach financiers a try soon. Enjoy!
Ingredients for 12 small cakes:
3 egg whites
1/2 cup white sugar
1/8 teaspoon salt
1/4 teaspoon vanilla extract
1/2 cup almond meal (or finely ground almonds)
3 tablespoons flour
3 oz unsalted butter (6 tablespoons), toasted to a golden-brown
12 small sliced of peach
- I used mini-muffin pans, so you'll have to adjust your time if you used regular muffin tins, or other molds.
- Bake for 5 minutes at 400 F., then top with fruit, and continue baking until browned, about 10-12 minutes.
In case you’re wondering if I thought of the name first, and then developed the recipe, I think we both know the answer to that question.That said, I really thought I could pull it off. The old cliché when it comes escargot is that it’s really just an excuse to eat garlic butter, and that the snail is just some sort of flavorless delivery system. Turns out that’s not the case. This suffered from a lack of meaty earthiness the escargot provides. Like I said in video, if I make this again, I will caramelize the mushrooms in a pan, which I’m sure would help.Or, maybe I’ll just use snails. Speaking of which, feel free to use this exact technique with actual escargot, as everything other than the mushroom was spot on. You can find those online, along with the other special items you’ll need, such as the shells, the pan, the tongs, and the forks.
So, whether you use mushrooms or snails, and please don’t use mushrooms,I really hope you give this classic French appetizer a try soon. No joke. Enjoy!
I could’ve squeezed this stuff into the last video (Demi-Glace Part 1), but it was already too long, and I didn’t want to rush through what’s just as important information. Plus, I really wanted to show some more gelatinized sauce slapping. People really seem to enjoy that, maybe a little too much.
Once you go through all the trouble of making homemade demi-glace, you’ll want to make sure you portion and store it properly, so that it provides you with many months of stellar sauces.
As seen in the video, you should get 16 nice blocks, each enough for about two servings, depending on the sauce. As amazing as this stuff is when used as a simple pan sauce, stay tuned for a few proper demi-based sauces at some point. I’ve always wanted to do a bordelaise sauce, and now we can.
Besides using this for sauces, you can also throw a block into braised dishes like short ribs, or coq au vin, and you take something already pretty great, and make it truly memorable. I hope you give homemade demi-glace a try soon. Enjoy!
If you saw the post from earlier today, you know this video has been delayed do to mysterious, and near catastrophic audio problems, but finally we have the first “demi” of the recipe, and I hope it was worth the wait.
This is my technique for veal demi-glace, and there’s not much to it. I’m going for a pure veal stock reduction, fortified with nothing more than mirepoix and tomato. I don’t do the classic roux-based “espagnole” sauce, which is traditionally mixed with veal stock and reduced by half.
Modern versions like this forgo the flour, and simply reduce the stock until the natural gelatin from the bones thickens things up. You get a much more intensely flavored sauce, with a wonderfully luxurious mouthfeel. I also usually make a pure version of the stock without the traditional “bouquet garni,” which is a very classic bundle of herbs and spices, usually wrapped and tied in a piece of leek.
It looks pretty, but I can add any or all of those flavors anytime I want, and we’re also always going to use this as a base for other sauces and applications, all of which bring their own herb and spice blends. Basically, like to keep my options open.
Stay tuned for part two, where I’ll show you what to do with this life-changing liquid, as well as how to portion and store it for many months of brown sauce nirvana. I hope you call your butcher and order some veal bones soon. Enjoy!
Ingredients for 3-4 quarts of Demi-Glace:
10 lbs veal bones, joints and marrow bones
1 tbsp vegetable oil
4 carrots, cut in 2-inch pieces
3 onions, cut in eighths (I did without thinking, but you don’t have to peel the onions)
4 ribs celery, cut in 2-inch pieces
1 (6-oz) can tomato paste
*10 quarts water
*While the stock simmers very, very gently for 18 hours, the level will drop a few inches in the pot, which is fine, but if it seems like the liquid level is getting low, add a few cups of water in.
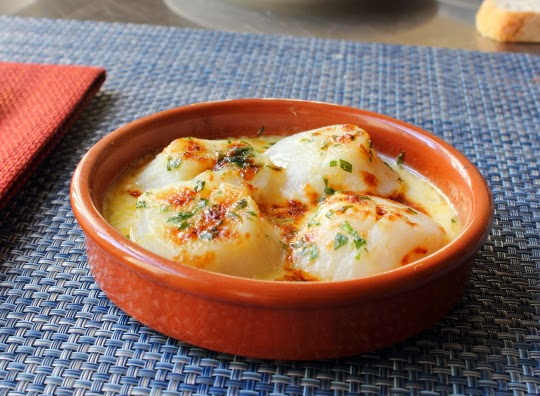
As far as I’m concerned, a simple gratin is the most delicious way to cook fresh scallops. The technique is infinitely adaptable, and as long as you’re keeping an eye on things during the broiler step, not a lot can go wrong. In fact, the only real way to screw this recipe up would be to use the wrong scallops.
And by “wrong,” I mean any that have been soaked in a preservative brine. These are easy to identify, as they’re usually sitting in a pool of milky liquid. What you want are usually sold as wild “day-boat,” “diver,” or “dry-pack” scallops. They are really expensive, and worth every penny.
Brined scallops have an unpleasant aftertaste, leak out tons of water, and shrink down to nothing. Other than that, they’re great. Ideally you’re getting your scallops fresh, but frozen will work, as long as the ingredient label says nothing but “scallops.” You’ll also want to thaw them slowly, and pat dry thoroughly before using.
This is a great dish for parties, as you can prep your ramekins ahead of time, and then pop them in the oven when you’re ready. I can’t give exact times, since this will depend on the size of your scallops, and dish, but just start in a nice hot oven for a few minutes, and then finish under the broiler, until browned and just cooked through. When the scallops spring back to the touch, they should be done.
Like I said in the video, if you’re not confident cooking seafood, and/or haven’t worked with scallops before, this gratin is a great place to start. I hope you give it a try soon. Enjoy!
Ingredients for 2 portions: 1/4 cup crème fraiche
1 teaspoon lemon zest
Pinch of cayenne
Pinch of salt
1/4 cup decent white wine
8 fresh scallops (mine were trimmed, but if need be, pull off any “feet,” which are tough, small pieces of muscle sometimes attached to the side of the scallop)
There are certain things that if I see on a menu, I will almost always order them, and brandade is one of those things. This amazing dish from the south of France can be made many different ways, but it’s usually some sort of combination of salt cod, potato, garlic, and olive oil.
Once made, it can be eaten as is, or turned into a beautifully browned and bubbly gratin. Actually, forget I said that, as this should always be baked and eaten piping hot, ideally with some homemade crostini.
The biggest (and only) challenge with this dish is handling the salt cod. It needs to be soaked in cold water for a day or two before you can work with it. However, depending on which salt cod you use, the time this takes can vary. If you’ve never used it before, follow the instructions herein, but maybe cut off a small piece once it’s soaked, cook it in a little bit of water, and test it for salt content. It should still be kind of salty, but not unpleasantly so.
As I mention in the video, the final product should get precariously close to being too salty, without going past that point. It's going to be similar to things like smoked salmon, prosciutto, or salami. This is why you should not do any salting, including when you boil the potatoes, until everything comes together.
This is a great recipe for entertaining, since you can make it ahead of time, and bake when you’re ready to serve. You can use one large shallow dish, or do a smaller size portion like I did here. Remember everything is cooked; so all you need to do is heat it through, brown the top, and serve. I really hope you give this a try soon. Enjoy!
Ingredients for about 24 snack-sized portions:
1 pound skinless salt cod fillet, soaked in cold water for 24-36 hours, changing water 4-5 times
2 bay leaves
6 springs thyme
1 1/2 cups whole milk
pinch cayenne pepper
1 teaspoon finely grated lemon zest
8 large garlic cloves, peeled, halved
1 pound gold potatoes, cooked until tender with garlic
I usually don’t mention the time of year during these videos, since I have no way of knowing when someone will actually view them, but when it came to this goat cheese and peach tartine, I couldn’t help myself. For me, this is summer on a slice of bread. My apologies to those of you reading/watching this in February.
August is national goat cheese month (no, I don’t know who decides these things), and what better way to enjoy chèvre than by topping it with sweet, ripe, impossibly juicy peach slices? Mix in a little thyme and black pepper to keep things interesting, and you’re looking at a very special treat. Just make sure to use stale bread.
As I bemoaned in the clip, I used a fresh loaf, which while perfectly delicious, wasn’t perfect. Staler bread would have produced a crunchier stage for our co-stars, as there’s more then enough moisture provided by the cheese and fruit.
By the way, if you don’t have any day-old bread, but still want to enjoy this post haste, simply toss the toasted, olive-oiled slices into a 350 F. oven for a few minutes, to dry out and crisp up before you top with the cheese. Either way, you're in for a significantly tasty summer treat. I hope you give this a try soon (while it’s still summer!). Enjoy!
Ingredients for each Warm Goat Cheese & Peach Tartine:
1 thick slice French bread, sourdough or not
1 tbsp olive oil, or as needed
2 oz fresh goat cheese
3 slices fresh peach
fresh thyme leaves and freshly ground black pepper to taste
I always get a ton of food wishes this time of year for creative brunch ideas, and I was thinking about doing some new type of eggs Benedict, when I happened to see a photo of a Monte Cristo sandwich. At first, it just made me want a Monte Cristo sandwich, but after that wore off, I started thinking about how I’d seen these topped with fried eggs before.
Long story short, I decided to simply make an open-faced version of the famous stuffed sandwich, and top it with poached eggs, and hopefully a new American brunch classic was born. Of course, I'll let you decide, but there was nothing I didn’t love about this plate of food. Okay, the salad was kind of phoned in, but the rest was awesome.
The base is a variation of our famous Restaurant Style French Toast recipe, which marries perfectly with the ham, cheddar and havarti. It was so tasty you really don’t even need the poached eggs. Actually, forget I said that. Do the eggs. If only so you can pop those yolks, and watch them run. Besides the eating, that has to be the best part.
I’ve also re-posted a poached eggs demo below, since poaching your eggs ahead of time is the only way to go, especially if you have a larger group. By the way, you can hold the Monte Cristo bases in a warm oven while you pull the rest of the meal together. I hope you give this new Benedict a try soon. Enjoy!
It would be impossible to pick a “World’s Greatest Dessert,” but if you’re going to have that conversation, the classic crème caramel has to be part of the discussion. When you combine stunning looks with amazing taste and texture, this classic is hard to beat. The way the almost-burnt caramel layer gets fused on, becomes one with, the creamy custard is nothing short of magic. Crème brulee gets more press, but people that know, know.
If my plea for you to use crème fraiche goes unheeded, yes, heavy cream will work here, but the subtle tang and nuttiness you get from the fermented cream takes this to places the regular stuff just can’t. It also seems to add some extra smoothness to the texture, and make no mistake; the mouthfeel with this classic is just as critical as the flavor.
I’ve not tested my theory, but other substitutions like buttermilk and sour cream should also work similarly. If you don’t have Grand Marnier, just using vanilla is fine, but the vague scent of orange rind that it provides the custard is really nice.
You also have the freedom to change the size and shape of your ramekins. Whether you use fewer, larger ones, or a larger number of smaller-sized ramekins, the procedure will work exactly the same. Of course, you’ll have to adjust the cooking times, but the “just set” doneness test will be your ultimate guide. I hope you give these classic treats a try soon. Enjoy!
Ingredients for 4 (6.5 oz) Crème Caramels:
*Scant 1/2 cup sugar, melted over medium heat until a dark caramel forms (just a tad less than a full half cup)
Presenting this gorgeous Grand Marnier soufflé to your Valentine at the end of a romantic dinner would certainly impress, but imagine actually making this while they watch. What a golden opportunity to show off your cooking skills, and a flair for the dramatic; not to mention the countless innuendos and double entendres such a scene would afford. Afraid it won’t turn out, and you’ll completely embarrass yourself? Too bad! No guts, no glory, and by “glory” we mean…glory. The good news is, contrary to popular belief, and many cartoons, soufflés are actually very easy to make. I hope after a few viewings of this video, and maybe a practice run or two, you’ll realize just how simple this really is. Of course, to make things a little exciting you can over-fill these like I did, which can cause some wild and unpredictably shaped soufflé tops.
I think they still look super cool, but if you stop filling a 1/4-inch from the top, they generally will rise a little straighter. Having said that, anyone who’d complain about the shape of a soufflé top has some serious issues, and should probably be asked to leave immediately.
By the way, I do have a Crème Anglaise video recipe in the works, but for now you’ll have to rely on the simple written recipe below. As I mention in the clip, this is an extremely impressive dessert “as is,” but when you pierce the top of that hot, steaming soufflé, and pour in the silky, sexy sauce…well, you saw the video. Let’s just say it’s a very nice touch.
Speaking of nice touches, if you’re still looking for that extra special Valentine’s Day dessert for your extra special Valentine, I hope you’ll put aside your fears and give this a go. You really should get lots of compliments. Enjoy!
Ingredients for 2 Grand Marnier Soufflés:
2 (8-oz) heat-proof ramekins, brushed inside with melted butter and coated with sugar.
Note: Mine were closer to 7-oz, which is why I overfilled them as you saw. This amount of batter should fill two 8-oz ramekins. Amounts may vary depending on volume of your eggs/meringue, so don’t be surprised if you have a little more or less.
Whisk everything together in a small, but heavy saucepan. Place over med-low heat, and cook, stirring constantly with a rubber spatula being scraped across bottom, until the mixture is hot, and thickens slightly. The mixture should not come to a simmer (but close). The temp should be around 180 degrees F. when it’s done. Remove from heat, strain to remove any over-cooked particles of egg, and let cool. If you want, you can add some fresh orange zest to the sauce as it cools. Serve ice cold with hot soufflé. View the complete sauce recipe
You often hear people describe food as “sexy,” but I’ve always believed it’s really more the occasion and company that makes a meal sexy. Put your Valentine across a candlelit table, pour a couple glasses of wine, and no matter what you serve up, sexiness will ensue.
Having said that, it certainly doesn’t hurt to hedge your bets and serve up a naturally sensuous dish like this simple, but sophisticated fish stew. This is great for you less than confident cooks, since your timing doesn’t need to be that precise. Did I mention there’d be wine around?
You can actually do everything ahead, up until adding the fish if you want. Since the pieces will cook in between 5 and 10 minutes, when you’re ready to eat, simply bring the mixture to a boil, add the fish, and simmer until done. You can also hold the stew over very low heat for a good 15-20 minutes without major problems, in case, well, you know.
By the way, make sure you check and see if your dining partner likes fish and wine, as this would be a horrible choice if they don’t. If they do, you’re in business. Almost any type of fish or shellfish will work in this, as well as any small, cute potatoes. Just don’t forget to peel the middles, as it's kind of a big deal. I hope you give this a try soon. Enjoy!