Jumat, 19 Februari 2016

Oxtail Ragu – Worth the Wait

Other than a completely unnecessary braising step right in the middle of the video, this oxtail ragu came out amazingly well. My thought was to roast the oxtails in the sauce, in a slow oven to see if I could achieve the tender-sticky meat I know and love, while slowly reducing the sauce at the same time. I couldn’t. 

Well, actually, it would have eventually gotten tender, but I wasn’t prepared to find out how long that was going to be. Like I said several times during the video, I want you to roast your oxtail and onion until nicely browned, but then transfer everything into a pot, add the rest of the ingredients, and simmer until the meat comes off the bones with minimal effort.

The only way to screw up this incredibly succulent cut of beef is to not cook it long enough, which is why I better not read any 3-star recipe reviews that say, “Good flavor, but wasn’t as tender as I wanted.” Just remember to not braise, and keep simmering until it yields completely to your fork. I really do hope you give this a try soon. Enjoy!


Ingredients for 4 portions:
(Pro tip: since this does take so many hours to simmer, it's almost always best to make this the day before you serve it)
3-4 pounds oxtail, cut into 2-inch sections, rubbed with olive oil, and seasoned generously with salt and freshly ground black pepper.
1 large yellow onion, diced
6 garlic cloves, roughly chopped
-- Roast at 425 F. for 45-60 minutes until browned
-- Transfer into a sauce pot, and add the following
1/4 cup sherry vinegar
4 cups tomato sauce or puree, or more if desired
2 cups chicken broth, or enough to cover the oxtails
* You can add as much sauce and/or stock as you want, as long as you have at least enough to cover
1 sprig rosemary
2 springs thyme
2 springs oregano
1 teaspoon kosher salt, plus more to taste
1/4 teaspoon red chili flakes
- Simmer on low, many hours, until tender
- Should be enough sauce and meat for 1 pound of pasta

Selasa, 16 Februari 2016

Stracciatella Soup – For When You’re 'Tore Up From the Floor Up'

You hear stracciatella often referred to as, “Italian egg drop soup,” which is fine, but knowing the name actually means little, torn rags, or shreds, works so much better metaphorically. 

When you’ve been run ragged, stracciatella is always there for you. After a long, infuriating day at work, you want something fast, filling, and comforting; ideally made with ingredients you already have on hand. This is all that, and less.

Sure, you could order some unhealthy, and expensive take-out, but that’s just a shame spiral waiting to happen. Better to beat up a few eggs with some cheese, and boil up the last of that homemade chicken stock, you made using this video.

By the way, if you’re a normal person, and don’t have homemade broth in the freezer, this works perfectly well with a high-quality, packaged broth. As you eat this, hopefully with some nice crusty bread, imagine all those little “rags” floating in the bowl are all your torn-up problems, both real and imagined. They were there, and then they were gone. You just won, with soup. I hope you give this stracciatella a try soon. Enjoy!


Makes 2 large or 4 appetizer sized portions:
6 cups nice rich chicken broth, seasoned to taste
3 large eggs
2 tbsp chopped fresh parsley
2 tablespoons semolina flour
1/2 ounce Parmigiano Reggiano (about 1/2 cup if grated on a microplane)
1/2 ounce Pecorino Romano cheese (about 1/2 cup if grated on a microplane)
salt and freshly ground black pepper to taste
pinch cayenne
pinch nutmeg
olive oil and pepper flakes to garnish

Jumat, 12 Februari 2016

Torrone (Italian Nut & Nougat Confection) – A Stirring Valentine’s Day Treat

The theme of this torrone post was originally about making this gorgeous candy for your Valentine, but then I realized what would be even better than making this for your sweetheart, would be making with your sweetheart.

While very easy, this procedure does take about one and a half hours to complete, and most of that time is spent standing at the stove, stirring, which is why tag-teaming this Italian confection makes the job much easier, and I’ll assume a lot more fun.

By the way, this is the real way to make torrone, and by “real,” I mean the really old way. Today, most candy makers use a much faster method, where a caramelized sugar syrup is simply added to the whipped egg whites. I’ve tried this both ways, and while the modern technique is way faster, I much prefer this method. It seems to have more soul, whatever that means.

Using this ancient technique, you don’t need to worry about precise timing, specific temperatures, or potentially painful burns. Besides, standing and stirring something on the stove for that long is surprisingly therapeutic. Watching the ingredients slowly, and magically change, as your home fills with the sweet aroma of warm honey, is almost as enjoyable as the amazing candy you end up with. Almost.

The visual clues, and times I give in the video should be enough, but don’t forget the cold water trick I showed you. That’s a great way to check you work, and sneak a taste. I hope you give this a try very soon. Enjoy!


Recipe adapted from this one by, Enzo Maragucci
Makes about 80 (1-inch) square pieces:
400 g honey (about 1 1/3 cups)
250 g white sugar (about 1 cup plus 3 tablespoons)
2 large egg whites
pinch salt
1/4 teaspoon vanilla extract
1 rounded tablespoon lemon zest
3 cups roasted almonds (I used Marcona almonds)
1 cup roasted pistachio
2 sheets “wafer” paper (*edible rice paper)
*Follow this link for info on the one I ordered
If you don't use the wafer paper, you can just spray plastic wrap with oil, and that also works. Some people use cornstarch, but I'm not a fan. Google for many other tricks.  

- I used an 8 x 11 baking dish to mold mine in.

Selasa, 09 Februari 2016

Zabaglione – Tastes Like Romance

When you go over the things you really want in a Valentine’s dessert, this ultra-simple zabaglione checks all the boxes. Assuming that your sweetheart enjoys things like sweet, juicy fruit enveloped in a rich, but impossibly light custard, this should work out nicely.

I like to use a dry Marsala wine, but sweet Marsala is also a popular choice. If you use the sweet variety you’ll need to cut down or eliminate the sugar.  If you’re not into warm wine foams, you can literally use any other flavorful liquid, and the technique will work the same.

You may need to change the garnish, but things like coffee, fruit juices, and pretty much any other liquor, or liqueur, will work with this technique. Experiment, and see what happens. So, whether you make this for that certain someone this Valentine’s Day, or just for a random weeknight treat, I really do hope you give this a try soon. Enjoy!


Makes 2 or 3 servings:
3 large egg yolks
3 tablespoons white sugar
1/4 cup dry Marsala wine
1/2 cup diced strawberries tossed with a spoon of sugar

Jumat, 05 Februari 2016

Bacon Jalapeno Popper Puffs – Seeing Spots

I had everything I needed to shoot a brand new chicken wing video, except for one key ingredient; a working oven. Yes, my oven decided to take the rest of Super Bowl week off, as did my oven repairman, but these bacon jalapeno popper puffs came out so well, I decided to designate this as an official blessing in disguise.

These pepper poppers in puff form really did come out incredibly well, as long as you don’t have a problem with lots of unsightly dark spots. Since we loaded these with so much diced pepper, the pieces on the outside caramelized (which is chef-speak for burned), and my beautiful, golden-brown balls were spotted with golden-black.

Apparently, I’m having more of a problem with the appearance than your average viewer, at least according to the first wave of YouTube comments, but I may still try to figure out a way to make these a little more camera friendly next time. Maybe I’ll puree the peppers first, or possibly char off the skin, which I believe gets even darker than the flesh. Stay tuned.

Superficial beauty aside, if you enjoy the gut-bombs that are classic, bacon-wrapped, jalapeno poppers, I think you’ll love these shockingly light puffs. All the same flavors are there, especially when served with the easy cream cheese dip, and the prep is much easier. I really hope you give these a try soon. Enjoy!


Ingredients for about 40 Bacon Jalapeno Popper Puffs:

For the dough:
2/3 cup water
3 tablespoons butter
1 tablespoon bacon fat
1 teaspoon kosher salt (or 1/2 teaspoon fine salt)
2/3 cup all-purpose flour
2 eggs

Then add:
2 ounces extra sharp white cheddar cheese
1/2 cup finely diced jalapeno peppers
1/3 cup finely chopped bacon
pinch cayenne
pinch freshly ground black pepper

- Fry at 375 F. for about 3 1/2 minutes, or until golden-brown and cooked through

For the dipping sauce:
1/2 cup cream cheese
1/4 cup crème fraiche or sour cream
2 tablespoons minced green onions
1 teaspoon fresh lime juice
- add enough water to thin mixture out to proper dip consistency

Selasa, 02 Februari 2016

2016 Super Bowl Prediction Using Chicken Wing Bones

Welcome to this year’s installment of “Get Rich Quick with Chef John,” where you cash in on my mystical method for picking Super Bowl winners, using the lost art of wing bone reading. I know it sounds crazy, but if you think this is some kind of joke, think again. In the 49 years I’ve been doing this, there hasn’t been a single (major) university study proving these results aren’t 100% accurate. Not one single study. 

Sure, we’ve had a couple of recent, very minor “discrepancies,” but instead of wasting time arguing who's at fault, or who lost who’s college fund, I prefer to look toward the future. This year the bones point to a decisive Carolina victory, and while I’ll be personally rooting for Old Man Manning, if you want to win money, you’ll put everything you have on the Panthers. 

I’m just glad the Patriots aren’t in it. They’re shady. Anyway, good luck, and I’ll apologize in advance for any income tax issues that pop up after this windfall. Good luck, and as always, enjoy!

Minggu, 31 Januari 2016

WALNUT BROWNIES CITARASAKU


Bukan tak boleh beli. Berlambak orang jual. Boleh pilih ikut citarasa. Tetapi Kjee buat sebab nak adjust ikut citarasa. Maklumlah kalau beli, depa buat macam ada lori gula terbalik depan rumah. Mokcik yang kena hadkan pengambilan gula, boleh beremang bulu roma!

Sebab itulah mokcik buat semalam. Makannya mokcik sorang. Nadia tak minat cokelat. UnclePali pulak asyik sibuk ke hulur ke hilir, lupa mokcik nak bagi jamah.

Resipi simple brownies Kjee intai kat blog Allrecipes yang disyorkan seorang fren FB. Katanya, dia dah cuba buat. Husband dia pun kata tak manis.

Tapi apabila Kjee amati resipi, tepung 60gms gula 200gms!! Aikkkkkkkk. Noktah.

So seperti biasa Kjee pun adjustlah. Dan hasilnya amat memuaskan. Tak manis dan terasa sedikit kepahitan cokelat sebab Kjee tambah semi sweet choc chips selain serbuk koko. Kjee memang suka dark and bitter chocolates.

Jom kita intai resipi.


EASY CHOC BROWNIES
sumber: allrecipes
olahan: sapa lagi?

BAHAN-BAHAN

110 gms mentega (unsalted)
200gms gula (Kjee letak 60gms soft brown sugar)
2 biji telor
60gms tepung naik sendiri
30gms serbuk koko
30gms semi sweet choc chips (kjee tambah)
secubit garam
1 sudu kecik esen vanilla
60gms kacang walnut cincang kasar (optional)

CARA

Panaskan oven suhu 180 selama 20 minit. Lenserkan acuan empat segi 20cm (7 atau 8 inci) dengan sedikit butter dan kertas minyak.

Butter dan gula dipukul. Apabila sudah kembang, masukkan telor. Kacau sampai rata.

Campur serbuk koko, garam dan choc chips (kalau guna) ke dalam tepung. Kacau rata dan masukkan ke dalam adunan tadi. Kacau rata kemudian masukkan esen vanilla. Kacau hingga rata. Masukkan kacang walnuts, kalau guna. Gaul rata dan tuang ke dalam acuan. Ratakan.

Bakar selama 25 minit. Kjee hanya guna api bawah.

Sejukkan baru dipotong-potong.

NOTA KAKI:
Oleh kerana Kjee guna hanya 60gms gula, maka rasanya tidak manis. Kerana itu, Kjee ayak sedikit gula aising. Ada kata kalau mau bagi kedut, gula kena banyak. Isyhhh tak payah ler. Muka aku dah cukup kedut. Hehehe


KWAY TEOW BEEF GINGER AIR TANGAN NADIA


Kali pertama Kjee makan Kway Teow Beef Ginger di The Hills Eatery di Wangsa Maju. Sedap sangat-sangat. Masa tu Nadia masih sekolah rendah di Taman Melawati. UnclePali belum wujud dalam hidup kami. Kami akan ke sana sekurang-kurangnya dua kali seminggu sebab suka sangat Kway Teow Beef Ginger mereka.

Kemudian satu hari, restoran tu hilang dari pandangan. Dah bungkus!! Punyalah kami kecewa. Kjee yakin tidak akan dapat rasa Kway Teow Beef Ginger sehebat di The Hills Eatery. Even kat Cosy Corner, Ampang Point pun tak boleh beat kehebatan di The Hills Eatery.

Satu hari, setelah berkahwin dengan UnclePali, kami singgah makan di Carrefour Wangsa Maju (sekarang Aeon Big). Ada orang jual Kway Teow Beef Ginger. Kjee punyalah excited. Tapi malangnya, ia tidak menepati citarasa kami.

Kemudian apabila kami meniaga di foodcourt Anjung Melawati, Kjee main-main aje buat Kway Teow Beef Ginger. Bukan untuk jual tapi untuk makan sendiri. Nadia kata sedap. Kjee suruh beberapa kawan rapat cuba. Mereka syorkan agar Kjee jadikan ia sebahagian menu tetap kami. And we didn't look back since.

Kway Teow Beef Ginger sangat diminati pelanggan kami. Malah, walaupun sudah lima atau enam tahun Kjee tak meniaga, kalau terserempak dengan customer dulu, especially pengarah Erma Fatima dan keluarga, pasti cerita pasal Kway Teow Beef Ginger Kjee menjadi topik utama perbualan. Hehehe.

Dah banyak kali Kjee suruh Nadia masak. Tapi entah kenapa tak pernah kesampaian. Bukannya susah nak buat pun. Atau pun sebab senang sangat nak buat maka dia pun berat nak masak. Hehehe.

Bahan penting dalam Kway Beef Ginger ialah daging. Kena guna daging batang pinang yang lembut. Daging lain tidak sesuai sebab daging batang pinang boleh dimasak dalam masak lima atau enam minit dan kelembutannya, terserlah.


Selain dari daging batang pinang, kway teow jugak memainkan peranan penting. Harus cari kway teow yang halus. Kalau yang tebal, rasanya akan lari.

Bahan-bahan lain untuk KT Beef Ginger hanya, bawang putih, halia muda dan kicap manis. Oppps jangan lupa air rebusan tulang ayam dan juga sedikit tepung jagung.

Oleh kerana Nadia hanya biasa masak untuk satu portion (seperti yang dilakukan masa tolong Kjee meniaga dulu), maka dia hanya guna lebih kurang satu genggam kecil kway teow, dua ulas bawang putih, dua tangkai daun bawang dan daging secukupnya. Daging dihiris nipis.

Tumis bawang putih yang telah diketuk-ketuk. Apabila naik bau, masukkan halia yang telah dihiris nipis. Halia perlu banyak sebab nama resipinya Beef Ginger kan? Hehehe. Untuk satu portion, Nadia hiris lebih kurang 2 inci halia muda.

Setelah halia garing, Nadia masukkan daging. Goreng hingga daging kecut. Oleh kerana guna api besar ala stir fry maka daging itu cepat masak dan masih lembut. Kemudian masukkan lebih kurang dua senduk kecil air rebusan ayam. Apabila sudah didih, masukkan lebih kurang dua sudu besar kicap manis. Nadia guna kicap Jalen. Jugak 1 sudu kecil kicap nampla atau fish sos atau kicap cair.

Apabila sudah mendidih, dia masukkan kway teow. Gaul pantas, masukkan lebih kurang 1½ sudu besar tepung jagung yang telah dicampur dengan satu sudu air rebusan ayam. Gaul pantas, campakkan lebih kurang ½ genggam daun bawang yang telah dipotong selebar 1½ inci. Gaul rata, padam api.

Hidangkan dengan cili padi yang telah dicampur sedikit kicap cair. Dan harus terus dimakan sebaik siap masak.


Kamis, 28 Januari 2016

Hot Baked Reuben Dip – Deli Up Your Super Bowl Party

This baked Reuben dip works so well that you’ll be racking your brain trying to think of other iconic sandwiches to convert into dip form. Of course, thanks to the Internet, most of this work has probably already been done, but something to keep in mind the next time you’re out of things to daydream about.

I went with pastrami here, but corned beef is more common, and probably the safer bet. Pastrami is heavily spiced with coriander and black pepper, and therefor your dip will be too. I love that kind of thing, but something to consider depending on your audience. No matter what meat you use, you’re going to be enjoying a truly delicious hot dip, which is also great warm, or room temp.

The seeded crackers I used in the video were great, but they’re a little on the pricey side, especially when purchased at the fancy cheese shop, so one of these days I need to show you how to make your own. Unless we all get rich betting on the game, using my guaranteed chicken wing bone method. In that case, we’ll continue to buy the crackers. I really hope you give this a try soon. Enjoy!


Ingredients for 24 servings:
1 pound sliced corned beef or pastrami
1 package (8 ounces) cream cheese, softened
1 cup sauerkraut, drained well, squeezed very dry
2 tablespoons sour cream
2 tablespoons mayonnaise
1 rounded tablespoon ketchup
1 rounded tablespoon Dijon mustard
1 teaspoon Worcestershire sauce
1/4 cup sweet pickle relish
1 teaspoon freshly ground black pepper
cayenne to taste
8 ounces “Swiss” cheese (4 ounces Gruyere and 4 ounces Emmenthaler)
crackers and bread

Selasa, 26 Januari 2016

MINI CHICKEN POT PIES


Akhirnya, setelah berminggu-minggu Kjee asyik tatap aje resipi dan cara pembikinannya di FB, hari ni Kjee berkesempatan membuatnya.

Walaupun membuat Chicken Pot Pie bukan sesuatu yang baru buat Kjee, namun selama ini, Kjee buat dalam ramekins. Letak inti dalam ramekin dan tutup dengan pastri. Kekadang Kjee beli puff pastri. Dan ada sekali dua Kjee buat sendiri.

Tetapi video yang ditunjukkan oleh page Tasty, buat Kjee tak senang duduk. Sangat cantik, mudah dan Kjee dapat bayangkan kesedapannya.

Resipi inti Kjee buat cara Kjee sendiri. Sudah pasti yang lebih mudah dan jugak kena dengan selera Kjee. Bahan-bahannya pun tak leceh sangat. Semua memang sentiasa ada dalam peti ais.

Hasilnya, amat memuaskan. Kjee buat dua biji sahaja kerana ia harus dimakan ketika masih panas. Tetapi harus hati-hati sebab intinya amat panas. Nanti melecur pulak bibir. Hehehe.

Selepas belajar buat mini Chicken Pot Pies ini, Kjee rasa Kjee nak pencen buat yang guna ramekins. Serius ni. I think I prefer this mini pot pies.

Jom kita lihat bahan-bahannya.


MINI CHICKEN POT PIES
sumber: Tasty
olahan : Kjee


BAHAN-BAHAN:
untuk dua biji mini pies

4 keping puff pastry jenama Kawan
1 biji telor

inti:

3 ulas bawang putih
1 mangkuk kecil mixed vege
1 mangkuk kecik ayam yang telah didadu/hiris kecik-kecik
½ kiub ayam
1 sudu besar tepung gandum
¼ cawan air
lada hitam secukupnya

CARA

Tumis bawang putih dengan lebih kurang dua sudu besar minyak. Kjee guna minyak Zaiton. Apabila sudah sedikit perang, masukkan ayam. Goreng sehingga ayam kecut. Masukkan ¼ cawan air, ½ ketul kiub ayam dan lada hitam tumbuk. Biarkan ia mendidih seketika. Kemudian masukkan mixed vege. Kalau tak ada, boleh dadu lobak merah dan jugak letak celery. Kjee suka guna mixed vege sebab mudah. Ada jagung, carrot dan kacang peas.
Masak hingga mixed vege lembut dan ayam sudah masak. Rasa. Ketika ini boleh tambah sedikit garam kalau suka. Tapi pada Kjee sudah cukup rasa.
Kemudian bancuh tepung gandum dengan dua sudu air. Curahkan ke dalam kuali bersama bahan-bahan tadi. Kacau pantas-pantas sehingga ia likat. Padam api.
Sejukkan.

Panaskan oven 200 darjah selama 10 hingga 15 minit.

Keluarkan pastri. Ambil sekeping pastri. Guna ramekin (mangkuk) yang cukup besar untuk 1 keping pastri. Potong keliling pastri. Buang bakinya. Sebenarnya lebih mudah dipotong guna pisau yang tajam ketika ia masih dalam keadaan beku. Kalau di suhu bilik, ia menjadi lembik. Kemudian ambil satu lagi ramekin yang lebih kecil dan toreh (jangan sampai putus) permukaan pastri yang sudah dipotong bulat tadi. Kemudian buat yang sama pada satu lagi keping. Tetapi untuk kepingan kedua ini, tak perlu ditoreh bahagian tengahnya.
Sapu pastri yang tidak ditoreh tengahnya dengan telor yang telah dipukul manja. Kemudian ambil pastri yang telah ditoreh tengahnya dan lekatkan atas sekeping pastri tadi. Sapu lagi telor. Buatlah sampai habis. Kjee buat dua biji sahaja.
Letak dalam loyang yang telah dilapik dengan kertas minyak. Bakar dalam oven yang telah dipanaskan selama 10-15 minit tadi. Penting oven mesti panas sebelum dimasukkan pastri supaya ia boleh cepat naik dengan suhu yang panas.
Ketika masukkan pastri ke dalam oven, Kjee hanya guna api bawah. Bakar selama 15 hingga 20 minit ikut kepanasan oven memasing.
Setelah berwarna keemas-emasan, keluarkan dan toreh keluar bahagian tengah yang telah mengelembung. Guna pisau tajam dan hati-hati jangan ranapkan keseluruhan pastri.

Isi dengan inti ayam dan mixed vege. Hidang terus.

Selamat mencuba.

NOTA KAKI:
Korang nak belajar lebih terpeinci untuk buat Mini Pot Pies ni, cuba korang bukak page Tasty kat Facebook. Kjee belajar dari situ. Scroll ke bawah page tu, mesti jumpa punyalah. Mudah sangat cara dia.


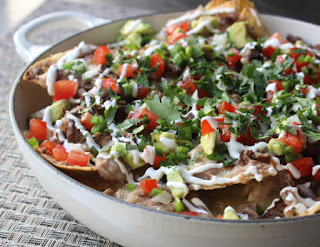
Super Deluxe Steak Nachos – Regular Nachos for the Big Game? I Don’t Think So.

I’m still trying to figure out how this video for super deluxe steak nachos ended up being over nine minutes long. I’ll blame the fact that I showed you how to do the steak and faux refried beans, but still, I always feel a little uneasy whenever we go past seven or eight minutes. Also, I don’t get overtime.

Be that as it may, this is one of my all time favorite party foods, and I’ve wanted to show you my version for a long time. As you may have heard, the Super Bowl is just a few weeks away, and this should get serious consideration when formulating your snack line-up.

Feel free to cook your meat medium-rare, or less, but as I mention in the video, I think medium works best if you’re using the recommended skirt steak, or flap meat. These cuts have a beautiful, beefy flavor, which, in my experience, is only maximized if cooked to a certain point.

Even though the meat is reheated when we melt the cheese, I still think medium is the way to go, and not just flavor-wise. I think the texture is better as well. These cuts are a little on the chewy side, which is accentuated if cooked rare. Having said that, whether you used raw, or completely well-done beef, you’re still going to be thrilled with the results. I still hope you give these super deluxe steak nachos a try soon. Enjoy!


Ingredients for about 3 of the same sized platters as I used:

For the steak:
1 tbsp vegetable oil
1 1/2 pounds skirt steak or flap steak (aka flap meat) seasoned on both sides with salt, freshly ground black pepper, and chipotle to taste
- cook to a medium (about 135 to 140 F. internal temp)

For the beans:
2 tablespoons bacon fat or lard
1 yellow onion, diced
1/2 teaspoon dried oregano
2 (15-oz) cans pinto beans, drained and rinsed
1 1/2 cups water or chicken broth, plus more as needed
1 teaspoon salt, or more to taste

You also need:
corn chips
12 ounces sharp cheddar
12 ounces Monterrey Jack
diced avocado (tossed in lemon juice and salt) 
diced white onion 
diced tomato 
finely diced jalapeño pepper 
sour cream 
freshly chopped cilantro 
* serve with hot sauce on the side, and lots of beer

Senin, 25 Januari 2016

KASTAD TELOR CHINESE STAIL


Dah lama Kjee cari resipi ni. Ia ala-ala Cawan Musyi, kastad telor Jepun yang sangat sedap. Kalau pergi ke restoran Jepun, memang wajib kami order sorang satu mangkuk. Kjee pernah tengok resipi cawan musyi tapi ia memerlukan banyak bahan Jepun. Kjee tak tau camner nak beli sebab tiap ke Jaya Grocer, Kjee nampak banyak bahan-bahan dari Jepun. Malangnya, tak reti nak baca. Semua dalam bahasa dia orang. Hehehe.

Malah Kjee pernah buat Cawan Musyi satu ketika dulu. Tapi hasilnya tak sama sebab tak letak bahan-bahan yang dicatatkan dalam resipi.

Jadi, apabila Kjee nampak Chinese Egg Custard di blog Elaine Sichuan China, Kjee cukup teruja. Kata Elaine, ia sangat popular di China. Popular dikalangan mereka yang dah tua dan yang sakit. Tak boleh makan makanan keras.

Maka Kjee pun amati resipi. Amat mudah. Hanya perlu 3 biji telor, air, garam dan minyak bijan! Cawan Musyi yang selalu Kjee makan, diletak udang serta hirisan halus cendawan. Diletak stok dashi (ikan yang dikeringkan) yang buat hidangan itu cukup sedap.

Tetapi oleh kerana mahu belajar buat kastad telor ini, maka Kjee ikut resipi asal. Cuma garam Kjee gantikan dengan fish sos Thai atau nampla. Dan Kjee gandakan ramuannya sebab kata Elaine, tiga biji telor hanya jadi 2 mangkuk. Kjee buat jadi enam mangkuk. Mungkin mangkuk Kjee kecil sedikit.

Hasilnya? Hmmm kastad telor ini cukup basic. Lain kali kalau Kjee buat, Kjee akan letak udang dan jugak cendawan. Kalau nak letak isi ayam, ia harus dirick nipis-nipis kerana waktu mengukusnya cukup singkat. Lebih kurang 12 minit sahaja!

Selain itu, jika mahu letak kiub ayam untuk menjadikan ia lebih sedap dan berperisa, tak perlu letak garam ataupun kicap.

Jom kita lihat resipinya.


CHINESE EGG CUSTARD
sumber: Blog Sichuan China

BAHAN-BAHAN

3 biji telor ayam
1 cawan air (225ml)
garam secukup rasa
beberapa titis minyak bijan
daun bawang

CARA:

1. Jerang air dalam kukusan. Apabila air sudah mendidih, perlahankan api hingga paling rendah.
2. Pukul telor hingga sebati. Tapis.
3. Masukkan air. Hati-hati. Kacau perlahan satu arah sahaja hingga air dan telor bersatu.
4. Masukkan garam.
5. Tuang perlahan-lahan dalam bekas. Biarkan ia rehat dalam 5 minit untuk pastikan tiada buih lagi dalam adunan.
6. Kalau guna bekas berpenutup, boleh tutup dan letak bekas dalam kukusan. Sekiranya tiada, tutup dengan alluminium foil. Ini untuk elak air menitis. Kalau guna kukusan bamboo, tidak akan ada titisan.
7. Naik sedikit api. Jangan terlalu besar sebab kastad akan mengelembung dan jadi kasar.
8. Kukus lebih kurang 12 minit atau sehingga kastad tu elok menjadi.

Kalau letak udang dan cendawan, masukkan ke dalam bekas setelah dituang kastad. Dan dikukus.

Selamat mencuba.


Next Up: Something Super Deluxe


Minggu, 24 Januari 2016

TAU MIU GORENG BERSAMA CENDAWAN ENOKI


Kombinasi cendawan Enoki yang berasal dari Jepun dengan Pea Sprouts atau dikenali dengan nama Tau Miu, yang menarik. Sebelum ini, Kjee hanya goreng Tau Miu sahaja. Goreng kosong letak bawang putih atau letak sekali udang.

Pagi tadi ketika Nadia ke Hero Market, Kjee suruh dia beli satu peket Tau Miu. Ia sayuran sekelompok dengan taugeh. Rasanya lebih kurang sama. Cuma warnanya hijau dan kepalanya ada daun. Hari tu Kjee dah beli dua peket cendawan Enoki.

Kjee hanya masak secara stir fry. Tau Miu dipilih, dicuci dan ditos. Kemudian Cendawan Enoki, dikerat pangkalnya yang keras dan dilerai-lerai. Tak perlu cuci.

Kjee ketuk 3 ulas bawang putih, panaskan lebih kurang dua sudu besar minyak jagung dan beberapa titis minyak bijan. Apabila sudah panas, masukkan bawang putih dan goreng hingga keperang-perangkan. Jangan sampai hangus. Kemudian masukkan Tau Miu dan goreng sekitar 5 minit atau sehingga ia menjadi lembut. Masukkan cendawan dan kicap cair. Kjee guna fish sosThai.

Golek-golek seminit dua, kemudian padam api.

Letak dalam pinggan/mangkuk dan taburkan lada sulah. Sedap dihidang ketika masih panas. Kjee suka ratah jer.

Kjee pernah buat letak udang dan cendawan tiram. Klik SINI.


Jumat, 22 Januari 2016

Chorizo Steamed Clams – How Do You Say “Ubiquitous” in Spanish?

I have always just called these chorizo steamed clams, "Spanish Clams," since it seems like there’s some variation of this on every Spanish restaurant menu I’ve ever seen.

What better evidence for a dishes’ deliciousness than that? Not to generalize about an entire culture, but the Spanish simply don’t put non-amazing things on every menu.

Sometimes they use beer, or white wine, or sherry; and many varieties of clams can be used; but the common denominator is the spicy, Spanish-style chorizo. Using such a flavorful sausage is sort of like cheating, and one of the main reasons the ingredient list is so short.

Speaking of which, you can really adapt this kind of thing to your tastes. Cilantro instead of parsley, leeks instead of onions, and mussels instead of clams, just to name a few. Just make sure you have plenty of grilled, or toasted bread around to soak up the glorious broth. I really hope you give this a try soon. Enjoy!


Ingredients for 4 appetizers, or 2 larger entrée size portions:
1 tbsp olive oil
1/2 cup finely diced onions
3 ounces Spanish chorizo, quartered, sliced
4 cloves garlic, minced
1 1/2 cups white wine
3 pounds Little Neck clams
1/3 cup chopped Italian parsley
2 tablespoons butter
grilled bread to garnish

Kamis, 21 Januari 2016

HASHBROWNS UNTUK SARAPAN


Pagi ini kononnya nak buat Hashbrowns untuk breakfast kami bertiga tetapi terkejut sedar-sedar dah pukul 6.30 pagi. Sempat Suboh lepas tu berlari ke dapur. Tapi UnclePali dan Nadia kata tak sempat kot nak sarapan bersama. Nadia asyik bising hari-hari jalan kat Keramat jem. UnclePali tak complain sebab mungkin dia drive ikut jalan lain.

Hashbrowns adik beradik lempeng. Kalau mak kita mesti kata.."ohhh Lempeng Kentang Sagat". Hehehe.

Tetapi oleh kerana dah teringin nak makan, Kjee pun buatlah. Buat sebiji aje cukuplah. Tetapi bila tengok kentang dalam pantri, semuanya besar-besar sebab masa beli hari tu plan nak buat inti karipap. Kentang besar senang nak kopek kulitnya dan dadu untuk inti.

Bila dah sagat baru Kjee sedar boleh buat dua biji Hashbrowns kalau guna kuali kenit non stick yang berukuran lebih kurang 6 inci. Hmmm kalau dua biji, maknanya, hari ni tak payah lunch. Elok jugak sebab Nadia dah warning pepagi tadi suruh Kjee rehat. Tiap malam dia balik, Mama dia asyik komplen penat. Hehehe.


Okay selepas buang kulit, Kjee sagat guna box grater. Perah dan buang air kentang tadi. Dadu sebiji bawang besar dan campur. Kemudian pukul telor sebiji, letak garam dan lada hitam. Gaul telor itu bersama kentang dan bawang tadi. Rasa. Mesti secukup rasa.

Kemudian panaskan kuali. Kjee guna kuali non stick yang berukuran 6 inci. Sapu sedikit mentega dan kaup kentang tadi letak dalam kuali dan leperkan. Jangan terlalu tebal. Guna api sederhana. Hanya diterbalikkan setelah dirasakan ia sudah garing. Kalau tidak, risiko Hashbrowns akan pecah. Pastikan Hashbrowns cukup masak baru dialihkan ke pinggan.

Ada perbagai cara untuk makan Hashbrowns. Kjee pernah jadikan ia burger. Caranya, letak daging burger yang telah dipanggang diatas sekeping Hashbrowns. Kemudian letak salah atau tomato dan lapikan dnegan sekeping lagi.

Kjee jugak pernah makan dengan Scrambled eggs. Dan jugak kalau malas, goreng aje Telor Mata.

Hari ni, Kjee letakkan sekeping cheese diatas Hashbrowns dan makan dengan Baked Beans.

Boleh makan dengan sambal tumis. Sukati kan. Tekak kita. Dan kita yang buat dia. Hehehe.

Selamat mencuba.


Hashbrowns dengan Scrambled Eggs


Hashbrowns Burger


Hashbrowns dengan Telor Mata Kerbau


Next Up: Something with Clams


Rabu, 20 Januari 2016

ACAR IKAN TALANG MASIN


Kali pertama Kjee buat Acar Ikan Masin ini menggunakan Ikan Kurau Masin bertahun-tahun yang lalu. Kalau tak silap, Kjee guna resipi Amy Beh. Buku tu entah hilang kemana. Sedap sangat.

Kjee sudah hampir terlupa kewujudan Acar Ikan Masin ni sehinggakan Kjee terjumpa dalam blog Che Mat Gebu. Menggoda sungguh air tangan Che Mat.

Hari-hari Kjee berkira-kira... nak buat ke tak nak? Jadi semalam, Kjee sempatlah ke Selayang dan singgah di satu kedai jual ikan kering yang terkemuka. Memang disitulah Kjee singgah beli ikan bilis dan udang kering masa meniaga dulu. Harganya amat berpatutan berbanding kedai lain.

Bersama Shida, adik angkat Kjee, kami memilih ikan talang yang sesuai. Dapatlah seekor yang menepati citarasa Kjee. Isi buat acar dan tulang-tulang masak gulai nanti.

Pagi tadi Kjee potong isinya lebih kurang 200grams dan rendam. Ikut benar-benar resipi Sifu Kjee tu. Tapi ketika sedang kemas-kemas rumah, Kjee terfikir yang 200grams tu sikit sangat. Alang-alang buat, elok digandakan. Maka Kjee pun tambah lah lagi 200grams.


Selepas lebih sejam direndam, sambil sekali sekala tukar air (kalau bonda dia rendam dalam air garam untuk kurangkan masin, katanya), akhirnya Kjee cuci bersih-bersih dan potong sebesar ibu jari. Kemudian Kjee toskan atas tuala kain yang bersih.

Sementara itu, Kjee siapkanlah bahan-bahannya. Semua rempah yang perlu, disangai dan ditumbuk halus. Kisar cili kering dengan halia, bawang besar dan kunyit. Serta kopek bawang kecik dan bawang putih. Kjee guna cili padi bangla yang pedas.

Ikan masin dan ditos, digoreng hingga keperang-perangan. Kalau ikut stail bonda, dia goreng garing lepastu diketuk-ketuk. Isyhhh banyak kerja. Hehehe.

Okay ikut resipi lengkap Mat Gebu DISINI.

Kalau Mat Gebu kata sedap, memang boleh percaya. Simpan setelah ia benar-benar sejuk dalam balang atau botol kaca. Tak kesahlah nak simpan dalam peti ais ataupun kat luar.

Selamat mencuba. Ratah sangat-sangat awesome.


Selasa, 19 Januari 2016

KAD JIMAT ELEKTRIK YANG TENGAH HOT


Sejak lewat tahun lepas lagi beberapa orang kawan Kjee pujuk Kjee join dia orang jimatkan kegunaan elektrik dan jugak minyak. Kjee ni species orang yang hanya akan percaya keberkesanan sesuatu product setelah Kjee cuba sendiri.

Bukan Kjee tak percaya dengan testimoni kawan-kawan. Tetapi bukan senang nak cari duit sekarang. Kalau labur dua tiga ratus lepas tu, hasilnya tak berbaloi, Kjee tak berani amik risiko.

Macam Kjee buat Transfer Factor 4Life dulu. Ramai kata ia boleh ubat macam-macam penyakit. Tapi Kjee tak nak percaya. Satu, memandangkan ia tersangat mahal. Dan dua, sebab Kjee dah cuba pelbagai ubat dan suppliment. Hampir semua tak serasi. Tapi Kjee berjaya ubatkan Asthma yang Kjee hidapi dalam masa 5 hari dengan TF. Kjee spend tak sampai RM169 masa tu. Satu botol ada 60 biji.

Kemudian orang kata tak nak kuruskan badan? Kjee senyum sambil geleng kepala. Zaman dulu, orang kata telan fat burners boleh pecahkan lemak. Kjee beli dua tiga brands fat burners. Kjee telan sekali gus setiap dos yang disarankan dari 3 jenis!

Ada Kjee kurus? Hahahah. Maleh nak story.


Sampailah Kjee jumpa L'arome Warm Serum. Hah mula-mula tak percaya jugaklah. Tapi terfikir jugak nak terai. Last resort. Kalau aku tak kurus, memang aku akan mati sebagai 'King Kong'! Alhamdullilah. Selepas menggunakannya selama 45 hari, dapat perbezaan yang cukup ketara! Maka, ia menjadi sumber inspirasi kepada ramai kengkawan Kjee yang senasib dan se kapal untuk mencuba.
Bab L'arome korang BACA SINI.

Okay berbalik kepada kad jimat elektrik. Ada kawan kata boleh jimat sampai 30% bil bulanan. Ada yang bernasib baik mencecah sampai 50%! Hmmm Kjee tanya UnclePali dan Nadia. Dua-dua angkat kening. Isyarat yang bererti "kalau nak cuba... bolehlahhhhh".

Maka Kjee belilah dari seorang kawan. Kjee suruh UnclePali tepek kat fusebox. Bulan pertama jimat RM12 jer! Alamak kalau setakat RM12 tak payahlah susah-susah beli kan? Kjee pasrah.

Kemudian, ada masalah dengan saliran elektrik dalam rumah. Rumah blackout setelah berlaku satu letupan dalam bilik air. Kjee call TNB. Technician sampai. Masa dia orang buat pembaikan, salah seorang nampak kad jimat eletrik yang UnclePali pasang.

"Salah tu abang pasang. Kena pasang macam ni."


Ini cara betul tepek

Ini cara betul


Ohhh patutlah jimat RM12 jer! Okaylah. Sekarang hanya tunggu bil terbaru untuk tempoh 19/12/15 hingga 19/1/16. Kita tengok samada ada penjimatan yang sepatutnya.

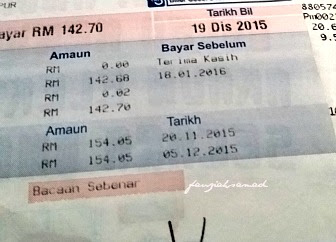
Pagi tadi, Kjee tengok ada bil TNB atas meja Kjee. Agaknya UnclePali yang bawak masuk malam tadi, masa dia balik. Terkejut Kjee tengok bil. RM176. Isyhhh tempoh 19/11/15 hingga 19/12/15 (iaitu bulan sebelumnya) RM142. Bil terbaru RM176! Mana jimatnya?!! Meningkat RM34 babe!

Walaupun terkejut dan agak kecewa, namun Kjee tak melatah! Kjee keluarkan salinan bil dari bulan Julai hingga bulan Disember 2015. Ini adalah kerana, sejak bulan Ogos, bil elektrik mula menurun dengan kadar yang agak mengejutkan. Penurunan bersebab.

Bil bulan Julai (masa tu hanya guna dua aircon serta barangan elektrik biasa) ialah RM237. Kemudian pada bulan Ogos (hanya guna 1 a/con sebab aircon bilik Nadia rosak), bil RM167. Penurunan sebanyak RM70. Bil Sept RM165. Oktober RM124. Nov RM154 dan Disember RM142!

Tetapi.. jeng jeng jeng, mulai Disember ada penambahan satu alat eletrik yang telan api macam naga...Water Heater. Jadi, pada bulan Disember bukan sahaja ada dua a/con (Nadia beli a/con baru) tetapi ada water heater yang menjadikan bil Dis/Jan sebanyak RM176!
 
Kalau bandingkan dengan bil bulan Julai yang hanya guna dua a/con (RM237) dan bil semasa RM176 (dua aircon dan water heater tak termasuk barang electric biasa rumah + 1 peti ais dua pintu +1 box freezer), Kjee rasa berbaloi guna Kad Jimat itu!


Kjee ni tak pernah pass matematik jadi Kjee tak dapatlah kira berapa peratus sebenarnya penjimatan yang Kjee perolehi sejak guna kad jimat ni. Tapi bak kata Nadia, tak kesahlah janji ada jimat kan?

Okay korang rasa berkesan ke tidak penggunaan kad La Genius Saver ni? Ada warranty  tiga tahun dan ia tahan diguna untuk 5 tahun. 

Harga untuk 1 set dua keping ialah RM250. Kalau korang rasa hanya perlu 1 kad, bolehlah share dengan kengkawan. Tapi ada yang letak 1 kad pada fuse box dan 1 lagi dilekatkan di tempat minyak kereta. Boleh jimat antara 50 hingga 70km. Tapi itu Kjee tak try lagi.

Dah bertambah satu lagi barang yang Kjee jual selepas Transfer Factor (yang kini Kjee dah berhenti dulu. Tapi kalau ada nak beli Kjee boleh tolong belikan dengan harga ahli), dan L'arome Warm Serum. L'arome ni Kjee masih aktif jual. Kjee rasa lebih penting kuruskan bodi dari wajah putih mulus kan? Hehehe.

Kalau korang minat, boleh WA 01131771389. Kad La Genius Saver ini adalah satu pelaburan yang berbaloi. Bayangkan penjimatan lebih banyak selama 5 tahun pengunaannya. 

Lihat carta dibawah untuk mengetahui berapa kad yang harus korang gunakan untuk mendapat penjimatan dari bil bulanan selama ini.

Kini ada promosi. Harga untuk tiga kad hanya RM330. Penjimatan sebanyak RM45. 

So korang yang asyik pening kepala nak fikir cara apa nak berjimat dengan kenaikan yang nampak tiada jalan penghujung, cubalah cara Kjee ni. 

Kjee tak tahu benar ke tidak tetapi ada yang kata, setelah tepek dua atau tiga bulan, penjimatannya akan lebih ketara sebab 'kad tu dah serasi dengan fuse box kita'. Kjee akan biarkan kad tu tertepek kat situ sampai bila-bila. Hehehe